This is the second article in the series building a chat app with Node and React JS. If you have not read the first part, you can read it here.
As discussed, MQTT provides a fast, efficient, and reliable way of transmitting messages between clients, making it well-suited for real-time chat applications. In this blog, we’ll explain how to implement a real-time chat application using MQTT.
Components of a Real-time Chat System
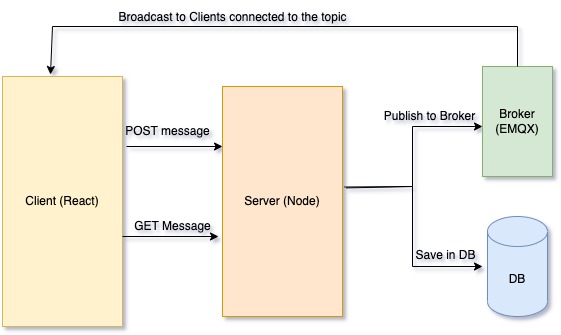
A real-time chat system typically consists of several components, including clients, a broker, and a database.
Clients: These are the devices or applications that send and receive messages in the chat system. Clients can be web or mobile applications, or even IoT devices.
Broker: The broker is the central component of the chat system that handles the communication between clients. The broker receives messages from clients, stores them in a database, and routes them to the appropriate clients.
Server: You can make a chat application even without this, but to gather more control and make things more robust, a server is a good choice. It sits between client and broker, and takes the logic away from the broker.
Database: The database stores messages and user information. This information can be used to keep track of who is online and what messages have been sent.
Implementing Real-time Chat with MQTT
To implement real-time chat with MQTT, we need to set up an MQTT broker and connect clients to it. The broker will handle the communication between clients and store messages in a database.
Step 1: Setting up the MQTT Broker
The first step in implementing real-time chat with MQTT is to set up an MQTT broker. There are many open-source MQTT brokers available, including Mosquitto and EMQ X. For this example, we’ll use EMQX, but the steps will be similar for other brokers.
- Go to EMQX official website and follow the docker pull commands.
- Once the docker is running, your broker is up and running, now you need to connect clients to broker.
Step 2: Connecting Clients to the Broker
Client is the tool where the users will read or write their messages. In this article, we will be using React to develop client, and we wont be going into the UI part. Just develop a bare minimum chat application frontend in React JS and then. Clients can connect to the broker using the MQTT protocol and a library, such as the mqtt library from npm. In MQTT, messages are sent to topics, and clients can subscribe to topics to receive messages. So after the connection, you have to subscribe to the topic (in this case it will be the unique identifier of the chat room) .The library provides an API for sending and receiving messages, and it takes care of the details of the MQTT protocol.
Steps followed by the client :
- Make an API call to the backend and fetch the last 10/20 published messages
- Establish Connection with the broker
import mqtt from 'mqtt/dist/mqtt';
const host = '<broker_url_where_docker_is_running';
const port = 8083;
const clientId = `mqttjs_ + ${Math.random().toString(16).substr(2, 8)}`;
const connectUrl = `ws://${host}:${port}/mqtt`;

//connect with the broker
useEffect(() => {
		client = mqtt.connect(connectUrl, {
			clientId,
			clean: true,
			connectTimeout: 40000,
			username: '<admin>',
			password: '<password>',
			keepalive: 60,
			tls: true,
			protocolId: 'MQTT',
			protocolVersion: 5,
			reconnectPeriod: 1000,
			will: {
				topic: 'WillMsg',
				payload: 'Connection Closed abnormally..!',
				qos: 0,
				retain: false,
			},
			rejectUnauthorized: false,
		});
	}, []);

// subscribe to the topic <the group chat>
useEffect(() => {
		if (client) {
			client.on('connect', () => {
				client.subscribe(topic_id);
			});
			client.on('error', (err) => {
				client.end();
			});
		}

		return () => {
			if (client) {
				client.end();
			}
		};
	}, [client]);

// start listening for new messages
useEffect(() => {
		if (client) {
			client.on('message', (topic, message) => {
				const payload = { topic, message: message.toString() };
				handleIncomingSubscription(payload.message);
			});
		}
	}, [handleIncomingSubscription]);

const handleIncomingSubscription = () => {} // handle the incoming messages
Step 3: Setting up the Server
We will setup a server in NodeJS. They key responsibilites of the servers would be:
- Handling incoming messages from the client.
- Publishing the incoming message to the broker on the given topic.
- Saving the incoming message on the database.
- Given a topic, fetch past messages from the database and send to the client.
Just like the client, we need to set up a connection to the broker from the server also. The steps are similar to the client, we just use the mqtt nodejs library in this case.
We also expose 2 API :
- GET /messages/:topic – This api expects a topic and returns the last 20 messages sent on this topic.
- POST /message – This api stores the message in the database and publishes it to the broker on the given topic. The broker then sends the message to all the clients that are connected to it and are subscribed to that topic.
// establish the connection
const mqtt = require('mqtt');
const connectUrl = MQTT_CONNECTION_URL ;
const clientId = `mqtt_${Math.random().toString(16).slice(3)}`;
const mqttUserName = MQTT_USERNAME;
const mqttPassword = MQTT_PASSWORD;

const client = mqtt.connect(connectUrl, {
  clientId,
  clean: true,
  connectTimeout: 40000,
  username: mqttUserName,
  password: mqttPassword,
  reconnectPeriod: 1000,
});


// publish to the topic
client.publish(topic_id, JSON.stringify(
      {
        ...messageObject,
        msg_id: msgId,
        ...(original_message && { original_message }),
      },
    ));
Conclusion
Real-time chat systems are becoming increasingly popular, and MQTT provides a fast, efficient, and reliable way to implement these systems. By setting up an MQTT broker, connecting clients to it, publishing and subscribing to topics, and storing and retrieving messages, we can build a robust and scalable real-time chat system that can handle the needs of a wide range of applications.
There is obviously some more code that you have to write, like identifying the sender of the message and thus decided which side the message has to be displayed, handling the media content, etc, but following these steps will help you get a head start and get the skeleton of the code ready.


0 Comments